728x90
반응형
SMALL
오랜만에 포스팅하는 것 같은데 오늘은 정형데이터를 다룰 때 자주 사용하는 기법 중 하나인
Boosting계열 그 중에서도 XGB 실습을 해보려고 한다.
import xgboost

print(xgboost.__version__) # xgboost 버전 확인
XGBoost는 전통적인 파이썬 래퍼 방식이 있고 사이킷런 방식이 있다.
순서는 파이썬 래퍼 XGBoost -> 사이킷런 래퍼 XGBoost로 소개하겠다.
### 파이썬 래퍼 XGBoost 적용 - 위스콘신 유방암 예측

import xgboost as xgb
from xgboost import plot_importance
import pandas as pd
import numpy as np
from sklearn.datasets import load_breast_cancer
from sklearn.model_selection import train_test_split
import warnings
warnings.filterwarnings('ignore')

dataset = load_breast_cancer()
X_features= dataset.data
y_label = dataset.target

cancer_df = pd.DataFrame(data=X_features, columns=dataset.feature_names)
cancer_df['target']= y_label
cancer_df.head(3)
print(dataset.target_names)
print(cancer_df['target'].value_counts())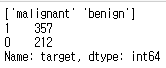
# cancer_df에서 feature용 DataFrame과 Label용 Series 객체 추출
# 맨 마지막 칼럼이 Label임. Feature용 DataFrame은 cancer_df의 첫번째 칼럼에서 맨 마지막 두번째 칼럼까지를 :-1 슬라이싱으로 추출.
X_features = cancer_df.iloc[:, :-1]
y_label = cancer_df.iloc[:, -1]

# 전체 데이터 중 80%는 학습용 데이터, 20%는 테스트용 데이터 추출
X_train, X_test, y_train, y_test=train_test_split(X_features, y_label,
                                         test_size=0.2, random_state=156 )

# 위에서 만든 X_train, y_train을 다시 쪼개서 90%는 학습과 10%는 검증용 데이터로 분리
X_tr, X_val, y_tr, y_val= train_test_split(X_train, y_train, test_size=0.1, random_state=156 )
print(X_train.shape , X_test.shape)
print(X_tr.shape, X_val.shape)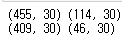
# 만약 구버전 XGBoost에서 DataFrame으로 DMatrix 생성이 안될 경우 X_train.values로 넘파이 변환.
# 학습, 검증, 테스트용 DMatrix를 생성.
dtr = xgb.DMatrix(data=X_tr, label=y_tr)
dval = xgb.DMatrix(data=X_val, label=y_val)
dtest = xgb.DMatrix(data=X_test , label=y_test)

params = { 'max_depth':3,
          'eta': 0.05,
          'objective':'binary:logistic',
          'eval_metric':'logloss'
         }
num_rounds = 400

# 학습 데이터 셋은 'train' 또는 평가 데이터 셋은 'eval' 로 명기합니다.
eval_list = [(dtr,'train'),(dval,'eval')] # 또는 eval_list = [(dval,'eval')] 만 명기해도 무방.

# 하이퍼 파라미터와 early stopping 파라미터를 train( ) 함수의 파라미터로 전달
xgb_model = xgb.train(params = params , dtrain=dtr , num_boost_round=num_rounds , \
                      early_stopping_rounds=50, evals=eval_list )

pred_probs = xgb_model.predict(dtest)
print('predict( ) 수행 결과값을 10개만 표시, 예측 확률 값으로 표시됨')
print(np.round(pred_probs[:10],3))

# 예측 확률이 0.5 보다 크면 1 , 그렇지 않으면 0 으로 예측값 결정하여 List 객체인 preds에 저장
preds = [ 1 if x > 0.5 else 0 for x in pred_probs ]
print('예측값 10개만 표시:',preds[:10])
from sklearn.metrics import confusion_matrix, accuracy_score
from sklearn.metrics import precision_score, recall_score
from sklearn.metrics import f1_score, roc_auc_score

def get_clf_eval(y_test, pred=None, pred_proba=None):
    confusion = confusion_matrix( y_test, pred)
    accuracy = accuracy_score(y_test , pred)
    precision = precision_score(y_test , pred)
    recall = recall_score(y_test , pred)
    f1 = f1_score(y_test,pred)
    # ROC-AUC 추가
    roc_auc = roc_auc_score(y_test, pred_proba)
    print('오차 행렬')
    print(confusion)
    # ROC-AUC print 추가
    print('정확도: {0:.4f}, 정밀도: {1:.4f}, 재현율: {2:.4f},\
    F1: {3:.4f}, AUC:{4:.4f}'.format(accuracy, precision, recall, f1, roc_auc))

get_clf_eval(y_test , preds, pred_probs)
import matplotlib.pyplot as plt
%matplotlib inline

fig, ax = plt.subplots(figsize=(10, 12))
plot_importance(xgb_model, ax=ax)
plt.show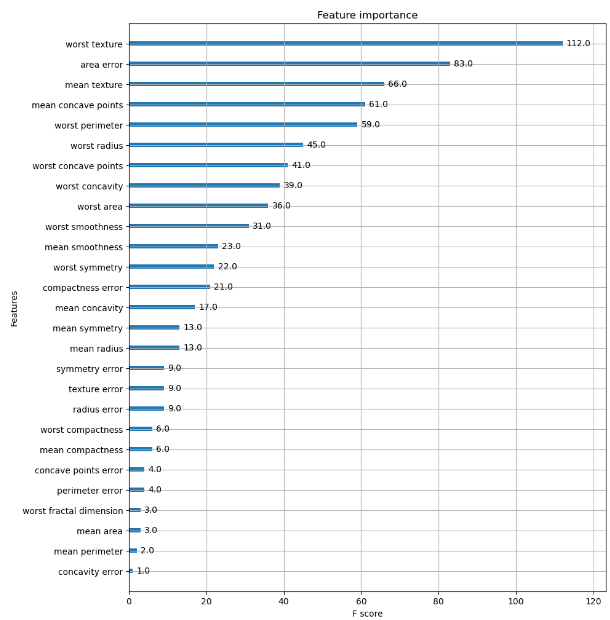
# 사이킷런 래퍼 XGBoost 클래스인 XGBClassifier 임포트

from xgboost import XGBClassifier

xgb_wrapper = XGBClassifier(n_estimators=400, learning_rate=0.1, max_depth=3)
xgb_wrapper.fit(X_train, y_train)
w_preds = xgb_wrapper.predict(X_test)
w_pred_proba = xgb_wrapper.predict_proba(X_test)[:, 1]

get_clf_eval(y_test , w_preds, w_pred_proba)
from xgboost import XGBClassifier

xgb_wrapper = XGBClassifier(n_estimators=400, learning_rate=0.1, max_depth=3)
evals = [(X_test, y_test)]
xgb_wrapper.fit(X_train, y_train, early_stopping_rounds=100, eval_metric="logloss",
                eval_set=evals, verbose=True)

ws100_preds = xgb_wrapper.predict(X_test)
ws100_pred_proba = xgb_wrapper.predict_proba(X_test)[:, 1]

get_clf_eval(y_test , ws100_preds, ws100_pred_proba)
# early_stopping_rounds를 10으로 설정하고 재 학습.
xgb_wrapper.fit(X_train, y_train, early_stopping_rounds=10,
                eval_metric="logloss", eval_set=evals,verbose=True)

ws10_preds = xgb_wrapper.predict(X_test)
ws10_pred_proba = xgb_wrapper.predict_proba(X_test)[:, 1]
get_clf_eval(y_test , ws10_preds, ws10_pred_proba)
from xgboost import plot_importance
import matplotlib.pyplot as plt
%matplotlib inline
fig, ax = plt.subplots(figsize=(10, 12))
# 사이킷런 래퍼 클래스를 입력해도 무방.
plot_importance(xgb_wrapper, ax=ax)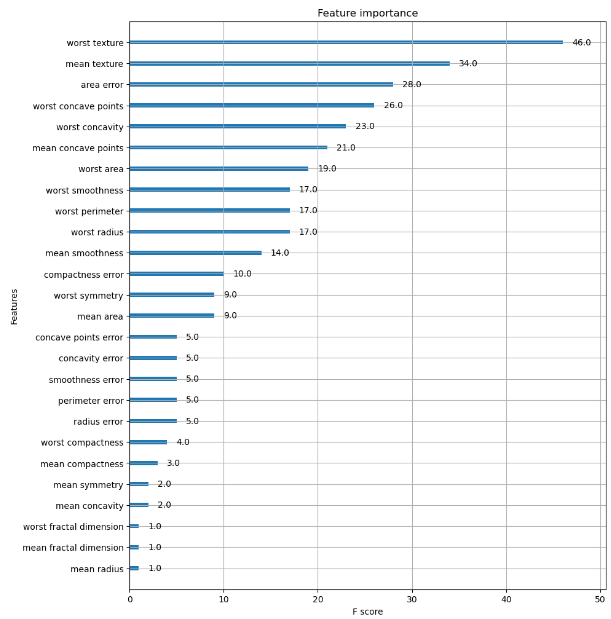
728x90
반응형
LIST
'코딩이야기' 카테고리의 다른 글
| 하루하루 코딩이야기 3 : pd.to_datetime(), Datetime feature 다루기 (0) | 2023.11.23 |
|---|---|
| 하루하루 코딩이야기 2 : 타이타닉 생존자 예측 (0) | 2023.11.17 |
| 하루하루 코딩 이야기 1 : Iris 붓꽃 품종 예측하기 (1) | 2023.11.14 |